Showing posts with label Kitchen Helpers. Show all posts

Saturday, February 23, 2013

Living More Simply: Dishwashing


Ah the dish washing chore. People around here, ok I, despise washing dishes. I thought that the dishwasher was God's gift to me, and people like me. Until I did some math and some real evaluating.

Have you ever noticed how much work a dishwasher really is? Really unless you have that stellar reputation of person who rinses and loads the dishwasher the very second after the dish is dirty, you have to scrub your dishes before they go in the dishwasher, or as everyone has witnessed from time to time the entire load ends up with crummy yucky stuff plastered to it.

Now that alone, seems like extra work to me. Usually if I've rinsed my dishes well enough to put them in the dishwasher I might has well have added the soap and they'd be clean by the time they got there! Seems like I just wasted time!

After pondering that, I started looking at all those things I cannot wash in my dishwasher. My pans. aren't the pans the worst part of the dishes? Couple that with the fact that most pans, especially those with any kind of non-stick coating, are not dishwasher safe, so if you are putting these things in the dishwasher you are voiding your warranties and not guaranteeing the safety of your pots and pans. The cast iron that I use often, can't be dishwasher-ed unless I want to re-season them every time I cook. Not a real useful thing.

Looking around at that I started wondering if there was more that I wasn't seeing. We stopped using the dishwasher and started washing ALL of our dishes by hand. I mean I was essentially doing that anyways! We stuck a towel on the counter and used that to lay dishes out to dry and after a month, lo and behold our electric bill was TWENTY DOLLARS cheaper! I never in my wildest dreams thought that the dishwasher could possibly eat up that much money!

After a few months of watching our electric bill being consistently cheaper, my husband had an assignment for his environmental science class to measure the amount of energy you used on a daily bases for something like four days. Now I had no idea you could actually calculate this total! I know I must be blonde right? (actually red-head, worse than blonde!) We did the math our dishwasher eats up 120 volts at 8.5 amps, meaning it eats up 1020 watts (volts times amps) while it's running.  If I did the other math properly (hours of use times current cost of electricity) with running the dishwasher once a day (about an hour) it eats approximately 17 dollars or electricity a month, not including the gas to heat the water it uses. So my totals were not that far off!

Looking at the hand washing method, I can safely assume that the amount of energy to heat three to five gallons of water that I use while hand washing (and sometimes used while rinsing and loading the dishwasher anyways) is significantly less than the dishwasher eats up. While I can't calculate for the water usage as we don't pay for water where we are at currently, I still would guess that it doesn't cost as much because I was using the water to rinse the dishes before they went into the dishwasher anyways. All in all for our family washing the dishes by hand is far simpler than washing them with the machine. As an added bonus my dishes have never been cleaner!

Now I'm not saying go out and tape off your dishwasher, never use it again. That would be crazy! But, if you are interested in living with less work and using less energy, it might be time to evaluate your dishwashers actual potential. Are you getting the bang for your buck? Turns out, we weren't!


Monday, October 15, 2012

My New Favorite Toy

The other day, in the midst of making my banana ice cream for my toddler (I promise I will share the easiest recipe in the world with you very soon!) My blender decided to die. . . It made this awful grinding noise and started emitting a terrible burnt plastic odor. Although I am sure it will work for a few more blends, I am too scared to touch it again. I really don't want to clean up the mess after it's final fail! Soo . . We did some research this time around.

We don't like spending money that we know is going to be wasted, really I just don't like spending money but that's beside the point. I figured buying another cheapo blender really would accomplish nothing but waste in the end. Even though a 3 year life is amazing for a $20.00 blender, if we spend more and buy quality, we won't need to replace it as often (if ever) and that is much better all around. No extra waste, no extra spending long term, and with the tool we want better results. Note: I said the tool we want. . .

I have been researching for months on blenders. The pro's and con's of high powered blenders, brands and price comparison's, durability, on and on and on. The blender I settled on is a Blendtec. They work great, have a good quality reputation, can do everything I would ask of a blender and their customer service is friendly. The problem: they start at around 350 and right now we can barely spare 50! I cringe at the thought of buying a lesser product to replace it later, but 350 is just not in the budget! and who knows how long it would take to come up with that kind of money! Plus we're in the midst of our canning season and we use the blender a lot!

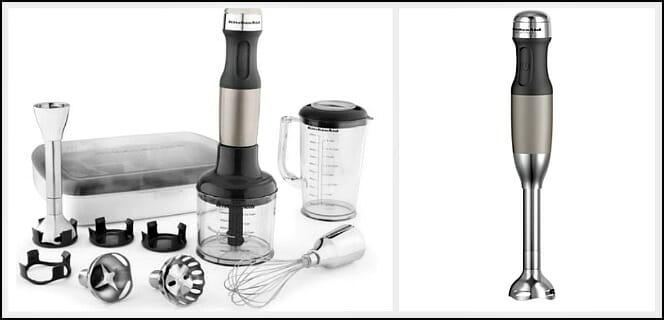
Recently, I have been hearing a ton about immersion or 'stick' blenders. They are compact, handheld, mini blenders with oodles of possibilities. We would want one of these anyways eventually, but just how many possibilities are there? Could we use one of these instead of a traditional blender? We decided to give it a try. In my usual stickler style, I decided we must buy a quality stick blender not just any old thing to test. I saw a Kitchenaid at Target and instantly I was hooked. I love Kitchenaid products, they work well and have awesome customer service! I bought it, took it home and to my dismay, the item I purchased, was used. It had been used, returned, and reshelved. I resolved to return it and replace it with an identical, unused one. Then I saw the booklet that showed the Kitchenaid Hand Blender product line.

They have a whole attachment series for these handy tools that could replace 2 other small appliances I own! The stick blender itself, the whisk attachment to replace our hand mixer and a chopper (essentially a mini food processor). So now to make a loooong story short, we bought this one:

At $100 it was a bit more than I wanted to spend, however, I love it! It blends fruit for smoothies beautifully and I'm coming up with hundreds of new recipe's to test including homemade mayonnaise! And as a bonus I get to pass along three small appliances that took up tons of space in my cupboards, but were pretty well necessity in our kitchen!

I promise to share in the future how well it works and if I indeed decide that it will permanently replace a full size blender. But for now it seems to work great!

Happy Monday!

Stephanie


Wednesday, September 12, 2012

Homemade Produce Bags . . Why pay $6.95 for three bags when I can make eight of them for $3?

Produce bags seem like a pointless project, I mean every grocery store provides plastic bags to carry your produce home right? But how often do you leave your produce in these bags in your fridge and have all of your food spoil?

I constantly was watching food spoil, I've heard that letting your produce breathe keeps this to a minimum, but a produce bag from the store won't let that happen!

Enter project: make simple produce bags to carry our produce, and store it in the fridge. We'll see how well they work in the next couple weeks.


These bags are so simple almost anyone can make them! I was impatient and spaced to take pictures while I was making them, but I don't think anyone really needs my amateur photo's to make these!

I bought a yard and a half of toole for $2.05. and had leftover jute yarn from a prior project, but you could really use just about anything to make a pull cord closure.

I cut the toole into rectangles, roughly a foot wide by 2 feet long. I then sewed a tube (for the closure) into one of the long sides. After that you fold the toole so that it is more square and sew the sides (except the tubed side) Run your ribbon through the tube and tie it so that it won't fall out. 

Ta Da!! Fabulous produce bags for almost nothing!!

Happy Projecting!

Stephanie

Simple Mason Sugar Jar


Over the past few months I have gotten sick and tired of my sticky messy sugar bowl and decided to get rid of it. There is just too much involved with the sugar bowl, Spoons and sticky messes left when an accidental drip lands in the bowl etc. Too much hassle!! 

The sugar bowl has been consistently gross for as long as we've had it! 


I wanted a sugar jar that I could use and not need spoons and not worry about dropping anything wet into it. So I arrived at a mason jar solution. I realized how simple the salt containers are when baking and decided to make something to work the same . . Version 2.0 might include a metal lid and will most likely work much nicer, but I decided that since I have no tools for the job I had better do the easy peasy way and avoid stitches. . .

To start I pulled out a mason jar and an empty salt container. . .


Ripping the lid off of the container was fairly easy . . 


After that I traced a mason jar lid onto the salt container top . . making sure to leave enough space around the spout to account for the mason jar ring. . . 


I used scissors to cut out the circle slightly smaller than the traced line . . Placed the new cardboard lid into the mason ring . . I had to secure it with a little hot glue to make sure that the lid doesn't buckle when opened and used . . .


All that was left is to fill the jar and label it! Easy Peasy Sugar Jar! No more mess, No more fuss! The morning coffee prep will be much less of a pain in the morning!

Enjoy!,


Stephanie