Thursday, September 27, 2012

My Diaper Routine

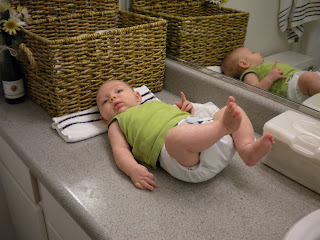
My little Helper Abba Zaba Ready To Show You Our Diaper System

Today seems like a good day for diaper posts. We have been cloth diapering our kiddo's since my 1st was about a month old. (We actually planned to cloth diaper from the beginning, but we got disposables at the baby shower and decided to use them.) With now two in diapers, we have a busy system to run! While my stash is relatively small, it does what we need it to do.

We run off of 36 infant sized diapers (mostly Bummis Organic Cotton Prefolds), 4 One size Rumparooz Covers (for the toddler) and 8 Newborn Rumparooz Covers and Snappi's. I also cut up and blanket edged flannel baby blankets into 2 huggies boxes worth of cloth wipes. (Which my insane butt actually folds up accordian style to come out of the box just like disposable wipes too.) We use a premade diaper wipe solution (poured over the wipes in the box, which last about a week) that essentially we just add water to. But once I am out of the premade I am considering making my own wipes solution. For diaper cream I also make a really awesome coconut oil based cream (Which I will tutorialize next time I make it.) that cleans up almost every diaper rash we've had within a few short hours, and I will continue to make it long after my girls are diaper free because it works quite similarly to neosporin in our house!
 This is the way I like the basket to look,
Diapers neatly folded, diaper cream and doublers in the close side, neatly stacked . . .

 And this is how our diaper basket normally looks, what can I say we have 2 in diapers.

To review our diapers, I have to say we absolutely love our diapering system, I really don't think we need to add anything more than what we have (except to replace what gets worn out) until we either have more babies or if we ever go back to needing the laundrymat.

I know that some people use all in one diapers and even pocket diapers for their cloth stash and I actually made some of my own before Noodle Doodle was born and I found that they got very little use. While they work great and yes disposable similar, they tended to get dirty and then take forever to dry, while the prefolds took half the time and the covers are mostly reusable, wipe out the inside, throw them back on over the new clean prefold. Unless I had a large stash of all in one diapers it really wouln't be worth it to me. (and all in one's are expensive!) however if I ever did want to use just all-in-one diapers, I would definately use Rumparooz All-In-One Diapers.

Our Rumparooz covers are the best! They have elasticized side gussets that catch almost every mess our kiddo's can dish out, they are very well made to be adjustable and the material stays leak proof longer than others I have tried. I love the hook and loop variety because it makes diaper changes almost as quick as disposables, however they do make a snap closure version and I've noticed that my toddler moves around really freely as compared to some other kids in cloth.The only thing I don't like about them is the logo patch in the back will sometimes leak overnight with heavy wetting.

The other part of our system is Bummis Organic Cotton Prefold's which I have to say soak well, clean up fairly nicely, and don't wear out as fast as others, we had to replace several prefolds from another brand because they started turning into strings in the wash. We do have extra soaker pads that I sometimes (when I remember) use at night time, but other than nights I haven't had a ton of problems with my Bummis prefolds.

And finally the Snappi. While these little gems aren't completely necessary, they keep the prefolds from slipping around a moving kiddo. They were made to replace diaper pins with something a little safer, and they do. It is a rubbery y shape with grippers on the ends that holds the diaper at the waist and then lifts up the rise (between the legs) to keep that diaper snugly in place. And now on to the locale.

My apartment, for all it's downsides has an awesome upside, an amazing bathroom counter. We decided that we wanted to make sure our girls were changed regularly in the bathroom for toilet training ease. When I saw this counter, I was actually kind of excited! Changing diapers on the floor in the last place was a little difficult! I have a diaper basket full of most of our diaper supplies on the counter with a "pillow" washcloth (which will more than likely be obsolete when our younger baby gets a little older and I don't feel so bad about sticking her on the counter without padding) our wipes live on the side next to the sink. Any diaper blowups and mess is easily cleaned up with a smooth surface and the sink and wash materials at the ready. Our bathroom also serves as a hiding for our laundry closet, where I hang the girls covers on the line. (which is normally their home, mostly because the girls use them before they make them into the basket most of the time)

The Diaper Zone

Covers (and socks) on the Line.

On another day I will share our diaper laundering system, but for now disinfecting is important and line drying covers really preserves their life!

So there  you have it, our diapering station extraordinaire! I hope you enjoyed your tour!

Stephanie

Wednesday, September 26, 2012

Paranoid?


A recent realization of mine is that we all tend to have a little bit of paranoia and conspiracy theory running around in the back of our heads. Hearing several of the health concerns and while I will admit, many a time our family err's on the side of caution and changes our habits. But lately I wonder, how much of our changes are based on fear?


Fear is a great motivator, a undeniably evil tormentor, and unfortunately something I have succumb to way too often. As a "crunchy" mommy I look at the health risks associated with everything, the risks of SIDS (which really hits me hard as two families in our last church have lost babies, and I have babies!) the risks of cancers, the risks of heart disease and a whole myriad of other problems, this worry list continues to grow with each discovery I make. "How could I have let this come into my house without even knowing?" I think. I indignantly glare at the objects and beat myself up for my lack of research about them.

Yes I worry, I worry more than I think I ever should. My worry list drags on and on until sometimes I wonder if anything in our lives is truly healthy for our kids. While I will continue to research and study and more than likely I will probably still worry, I am reminded of one true fact. God is in control. Period. No if's. No and's. No but's. Our kids could face horrible things whether or not we change every bad thing in our lives. There is nothing we can say or do. In fact many a time we worry about things that, even though they are possibilities, they will NEVER happen. Not to say that nothing will happen or some of those things won't take place, or even that we shouldn't take precautions to safeguard our children, but I think sometimes in this journey we need to stop focusing on what could happen if we don't do this or that. It is out of our control whether or not things happen.

God gently reminds me that all things work together for good for those who love the Lord.(Romans 8:28) His eternal being knows my life, my heart and my kids better than I ever will. He knows everything good and bad that is going to happen and he knows the end. We can be confident that he will work it all out for his good and his plan.  As Billy Graham said, "I've read the last page of the Bible, It's all going to turn out alright." What more is there to say?

For God hath not given us the spirit of fear; but of power, and of love, and of a sound mind. ~ 2 Timothy 1:7 KJV

Therefore since we are receiving a kingdom that cannot be shaken, let us be thankful, and so worship God acceptably with reverence and awe, for our God is a consuming fire. ~ Hebrews 12:28-29

For I know the plans I have for you, declares the Lord, plans to prosper you and not to harm you, plans to give you a hope and a future. ~ Jeremiah 29:11

As we meditate on God's word and grow closer to him, he holds us, he stabilizes our walk and he and he alone holds the future. Don't forget that Satan had to beg God's permission to attack Job. He will not allow us to be faced with anything we cannot handle with his help.

Let the peace of Christ rule in your hearts, since as members of one body you were called to peace. And be Thankful. ~Colossians 3:15

Just some things to keep in mind before you throw away everything you own because it's unsafe. :o)
(I know I needed the reminder! Pray for me! I need it to battle my fear! If you need prayer feel free to comment, I will pray for you too!)

Stephanie

Monday, September 24, 2012

Homemade Deoderant

Inspired by several of my favorite blogger's I have decided to make my own deodorant. I have never fully been comfortable with traditional store bought deodorant and after a few months of research I realized why. It is basically a chemical concoction that can cause a myriad of different problems.Including aweful pit acne. I can do better than that for sure! So after some research I noticed a pattern. Most deodorant recipe's call for an deodorizer, a dry seeking product, and scent. So here it is:

Simple Homemade Deodorant

1/2 Cup Baking Soda (Deodorizer)
1/2 Cup Arrowroot Powder (Dry Starch)
5 Drops Tea Tree Oil (For scent and disinfecting properties)
5-10 Drops Lavender Oil (Scent to your preference)
Coconut oil to desired consistency (Moisturizer)

Mix all ingredients in a bowl until smooth. Jam deodorant into container of your choice. (I used an old Dove deodorant container and a mason jar for what wouldn't fit in the stick)
Apply gently, A little goes a long way!
Enjoy smooth, non-stinky pits! With no chemical concerns!

Now wasn't that easy!

Now here are the pictures . .

 Mixing the ingredients

 Although it's hard to see this was after jamming half of it into the deodorant stick

Finished Product, Isn't it lovely?

Happy Naturalizing!
Stephanie

A Bridge, A Park, and One Exhausting Day Out!

Saturday was quite the amazing day out for our little group.

Daddy-O and Momma-N
 Daddy-O had a field trip for Geology class and as the increasingly curious Noodle Doodle is obsessed with rocks right now, I thought a field trip learning about rocks would be a cool thing for her.I was soooo wrong! We spent most of the morning bored in the car because the rocks they were exploring and talking about, were stops on the side of main roads. . Not exactly my idea of a fun thing for a 18 month old and a 2 month old. So rather than watch my precious Noodle Doodle try and play chicken with the cars, we opted to stay in the car while daddy did his extra credit field trip.

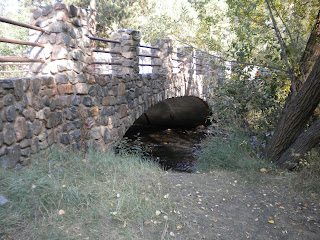
Gorgeous Bridge 
Now this isn't to say the field trip was all bad or that they stayed in the car the whole time, but a lot of it we did. Man were the girls bored! Abba Zaba hates her car seat with this awesome passion and Noodle Doodle was just about done with it so after the field trip, we all headed up the mountain and found this really cute little park with this shallow little stream and this beautiful, and I mean beautiful, old stone bridge. We had our little picnic and had some time to play in the water (shallow enough for a toddler, always nice!) and went on a short hike. I think that must at least slightly make up for the morning long car ride. (I hope) The girls loved getting out in the air (Abba Zaba slept but, I think somewhere she still enjoyed it) and Daddy-O and I got to see some incredible views that unfortunately are not part of our every day life anymore. This kind of place and these treks are where Daddy-O is happiest. Teaching Noodle about plants, taking in fresh (er) air, and just enjoying the natural world God created for us. Since we moved farther into the city fresh air is harder to find. We can't wait to move again! But then I'm still apprehensive.

Pretty View, Love this Park!


Standing in the forest on a hiking trail with beautiful views is always almost serene. I love my little corner of the world in so many ways, but I think seeing these little corners is so rare that I am almost excited about the possibility in front of us. We may be leaving this crazy area and finding a new corner to raise the girls, and a new beauty to discover. While this idea has been making me very nervous and pretty crazy, this notion to move has been on our hearts for several years now. Since before Daddy-O and I got married. Daddy-O didn't actually want to stay here when he got home from Japan. So now I am feeling more and more that God is calling us away. He has been preparing me, I feel more prepared for a move now. I will miss this little corner of heaven on earth, but I know a new little corner of heaven is right around the next bend. It helps that I can take part of it with me, my little family :o)


Daddy-O and Noodle Doodle


Abba-Zaba's

Happy Trekking!!

Stephanie 

Monday, September 17, 2012

Homemade Vanilla Yogurt


Ahh, yogurt, great with fruit or even just by itself. Full of good bacteria and loaded with great nutrients. One dietary need that makes digestion easier, as well as weight loss. It regulates metabolism and generally leads to a healthier you. As adding probiotics to your diet often will. The only problem is that the yogurt you buy in stores is either expensive, full of bad stuff like high fructose corn syrup and preservatives, or both! Making it at home ensures that great benefit, on a budget and without the nasty stuff that almost negates the benefit you would receive. 

I have been experimenting with several methods of making yogurt for quite some time and have developed a method that works for me. Experiment with this and other recipes to find what works best for you! The benefits are definitely worth it!

Really you can make whatever kind of yogurt you want with this recipe, but be aware that leaving out the honey (or maple syrup) makes very sour yogurt!

To begin you will need:

A large pot for sanitizing jars and later incubating the yogurt (I use the bottom half of my pressure cooker)

A sauce pan of pot large enough to hold half a gallon of milk, (I use a 6 quart pot, but really you could use a smaller pot, I make 2 quarts (half a gallon) at a time)

a thermometer that will measure as low as 100 degrees Fahrenheit and up to at least 180 degrees Fahrenheit (I am told you can use your own judgement, but this really is much easier with the thermometer)

2- quart sized mason jars or 5- 2 cup mason jars to store your yogurt. (you can use other storage means, however glass seems to work best as you can sanitize it easily and it can be used for everything, incubation and storage)

1/2 gallon of milk

1/2 cup to 1 cup honey or maple syrup

1/2 ounce of vanilla

Yogurt Starter (can be either freeze dried starter like I used today or 1/2 cup of plain cultured yogurt either from a  previous batch or from the store)

About an hour and the ability to check on your yogurt throughout the day.

Lets begin:


Put your milk, honey or maple syrup (sweetened to your preference), and vanilla into your saucepot and turn the temp to medium- medium high.
Keep stirring your milk and check the temperature often, it needs to be 180 degrees, at this temp it will start to form a film on the sides of the pot and it is almost boiling.

In the meantime, fill your incubation pot with hot water and place in your jars. Bring this pot to a rapid boil. (I usually put my lids in as well, but this isn't necessary as you aren't actually canning these) Boil your jars for about 5 minutes and then drain the jars (not the pot) and turn them upside down on a towel to dry. Turn the heat off on your incubation pot (you may even need to add a little cold water before incubating your yogurt).

Once your yogurt reaches 180 degrees, Turn off the heat and remove 1-2 cup of milk from the pot. Divide the remainder between your incubation jars. Now all of these jars and your removed milk needs to cool to about 120 degrees.


At 120 degrees you will mix in your starter. Take your 1/2 cup of yogurt or 10 ml of freeze dried starter and add to the milk you set aside. Don't mix this too much! you will just need to stir enough to wet the freeze dried or mix chunks into the milk. I usually use a smaller mason jar and cap it and shake gently once or twice.


 You will then divide this milk between your incubation jars. Make sure there are a few chunks of starter in each jar.
Cap your incubation jars and turn them upside down (and back up) twice.

Make sure your incubation pot's water is at 120 degrees or less. Too hot and the cultures will deactivate and you will end up with soupy yogurt. Once to temp, put your yogurt in the incubation pot.
You will now leave it there, alone. . don't disturb your yogurt for several hours. You will want to periodically check the water to be sure the temp stays in between 85-110 degrees. You can turn the stove on to heat the water when needed. Keep the water warm for the entire incubation time which is anywhere from 4 hours up to 18 hours, I used to leave it over night, but the water would cool making the time pointless, I now leave it for 8-12 hours depending on my schedule.
That's it, once your incubation is done you should have thick creamy yogurt, better than you could get in the store! Put it in your fridge and enjoy it!


Happy Feasting!

Stephanie

Friday, September 14, 2012

Toddler TeePee

Not to make every one sad now, but this post is more meant to share this awesome project than to tutorialize it. Even though I mostly made this teepee on my own pattern drawn from the back of my head it was inspired by Meg McElwee's book Growing Up Sew Liberated I figured it wouldn't be fair to give up her basic pattern.


  This TeePee has a door and round window, is made from a heavy muslin and outdoor fabric, and is supported by bamboo stakes from the garden department at home depot. And . . .

My girls (or should I say my oldest and her cousins) love it!!

Happy Projecting!

Stephie

Wednesday, September 12, 2012

Homemade Produce Bags . . Why pay $6.95 for three bags when I can make eight of them for $3?

Produce bags seem like a pointless project, I mean every grocery store provides plastic bags to carry your produce home right? But how often do you leave your produce in these bags in your fridge and have all of your food spoil?

I constantly was watching food spoil, I've heard that letting your produce breathe keeps this to a minimum, but a produce bag from the store won't let that happen!

Enter project: make simple produce bags to carry our produce, and store it in the fridge. We'll see how well they work in the next couple weeks.


These bags are so simple almost anyone can make them! I was impatient and spaced to take pictures while I was making them, but I don't think anyone really needs my amateur photo's to make these!

I bought a yard and a half of toole for $2.05. and had leftover jute yarn from a prior project, but you could really use just about anything to make a pull cord closure.

I cut the toole into rectangles, roughly a foot wide by 2 feet long. I then sewed a tube (for the closure) into one of the long sides. After that you fold the toole so that it is more square and sew the sides (except the tubed side) Run your ribbon through the tube and tie it so that it won't fall out. 

Ta Da!! Fabulous produce bags for almost nothing!!

Happy Projecting!

Stephanie

Simple Mason Sugar Jar


Over the past few months I have gotten sick and tired of my sticky messy sugar bowl and decided to get rid of it. There is just too much involved with the sugar bowl, Spoons and sticky messes left when an accidental drip lands in the bowl etc. Too much hassle!! 

The sugar bowl has been consistently gross for as long as we've had it! 


I wanted a sugar jar that I could use and not need spoons and not worry about dropping anything wet into it. So I arrived at a mason jar solution. I realized how simple the salt containers are when baking and decided to make something to work the same . . Version 2.0 might include a metal lid and will most likely work much nicer, but I decided that since I have no tools for the job I had better do the easy peasy way and avoid stitches. . .

To start I pulled out a mason jar and an empty salt container. . .


Ripping the lid off of the container was fairly easy . . 


After that I traced a mason jar lid onto the salt container top . . making sure to leave enough space around the spout to account for the mason jar ring. . . 


I used scissors to cut out the circle slightly smaller than the traced line . . Placed the new cardboard lid into the mason ring . . I had to secure it with a little hot glue to make sure that the lid doesn't buckle when opened and used . . .


All that was left is to fill the jar and label it! Easy Peasy Sugar Jar! No more mess, No more fuss! The morning coffee prep will be much less of a pain in the morning!

Enjoy!,


Stephanie


Tuesday, September 11, 2012

Introducing . . .


To open, I'm not much of a writer.
My life revolves around my God, my Husband, and my Kids.
To me simple living is living radically for the Lord and not in pursuit of stuff as the world.
I plan to write often about things that I've done things I've tried craft wise, home wise, and natural living wise. . . however I have a funny suspicion my life will get in the way, as my two active lovable girls take precedence over writing. . Bear with me, you might enjoy what I have to say!